Cheesy Chicken Crescent Rolls
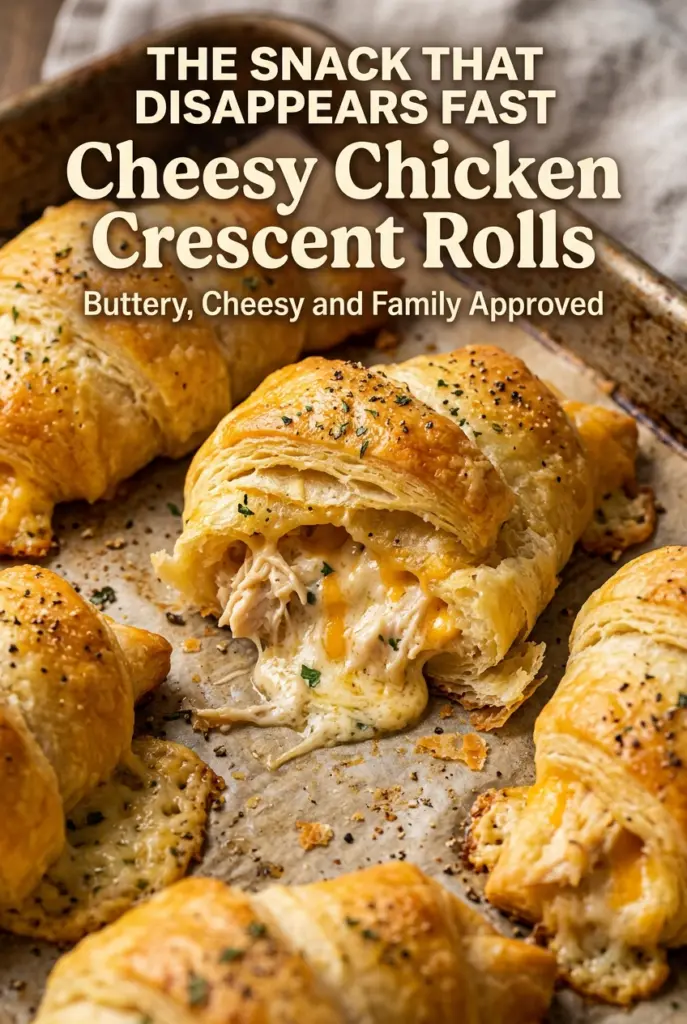
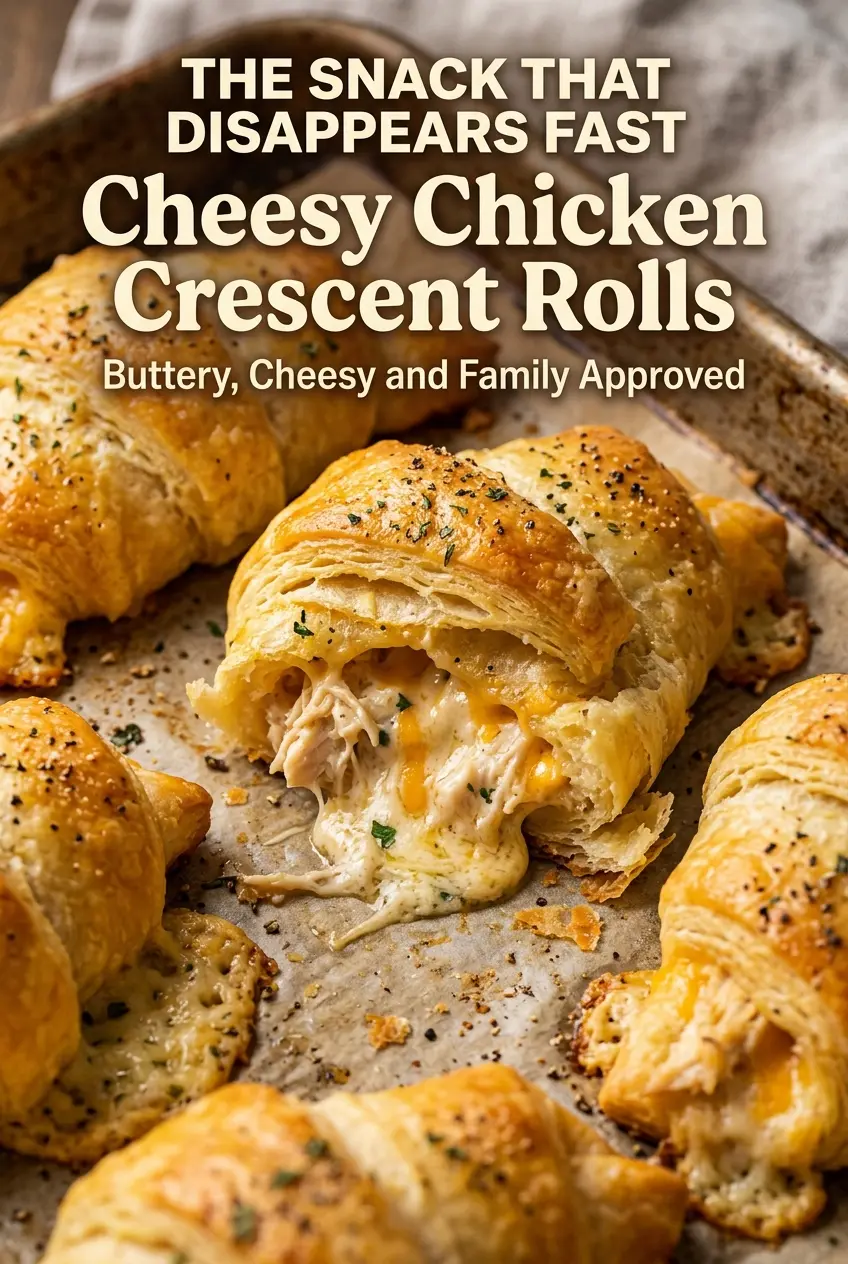
Golden, flaky crescent rolls wrapped around a creamy chicken filling are the kind of thing that disappears fast from a tray. The dough bakes up crisp at the edges and…
Tip: save now, cook later.Golden, flaky crescent rolls wrapped around a creamy chicken filling are the kind of thing that disappears fast from a tray. The dough bakes up crisp at the edges and tender underneath, while the center stays rich and savory without turning runny. That contrast is what makes these rolls worth repeating: they taste like extra effort, but they come together with pantry-friendly ingredients and a short bake.
The filling works because the cream cheese and sour cream bind the shredded chicken into something scoopable, not wet. Shredded cheddar brings the salty pull you want, and the garlic and onion powder keep the flavor balanced without making the mixture taste heavy. The one thing that matters most is keeping the filling thick enough to stay inside the dough as it bakes. If it’s loose, the rolls will split and leak before the centers are set.
Below, I’ll walk through the small details that keep these rolls neat and golden, plus a few smart swaps if you want to change the cheese, use rotisserie chicken, or make them ahead for a busy night.
The filling stayed creamy and the bottoms got crisp instead of soggy. I used rotisserie chicken and they still baked up perfectly in 14 minutes, which made them an easy dinner win.
Save these cheesy chicken crescent rolls for the nights when you want a flaky, creamy, crowd-pleasing dinner with almost no cleanup.
The Filling Has to Stay Thick Enough to Hold Its Shape
Chicken crescent rolls fail when the filling turns loose in the oven. Cream cheese helps bind everything, but sour cream can push it toward runny if the chicken is still warm or the mixture gets overmixed. You want a filling that mounds on a spoon and keeps its shape when you scoop it onto the dough.
Shred the chicken finely enough that it packs together, but not so fine that it turns paste-like. If you use rotisserie chicken, pat any excess moisture off before mixing it in. A thick filling stays where you place it, which means the crescents bake up sealed instead of splitting at the seam.
What Each Ingredient Is Actually Doing in This Dish

- Cooked shredded chicken — This is the backbone of the filling. Rotisserie chicken works well because it’s already tender and seasoned, but any cooked chicken is fine as long as it’s fully cooled and not watery.
- Cream cheese — This gives the filling body and keeps it creamy after baking. Let it soften first so it blends smoothly; cold cream cheese leaves lumps that don’t melt out evenly.
- Shredded cheddar cheese — Cheddar adds salt, tang, and that stretchy, melty center. Sharp cheddar gives the strongest flavor, but mild cheddar works if that’s what you have.
- Sour cream — This loosens the filling just enough to make it spoonable and adds a little tang. Use full-fat if you can, since low-fat versions can break down more easily and add extra moisture.
- Refrigerated crescent roll dough — This is what gives you the flaky, buttery shell without extra work. Keep it cold until you’re ready to shape it, because warm dough tears and sticks.
- Butter and parsley — The butter browns the tops and gives the rolls that bakery-style finish. Parsley is mostly for color, but it also cuts through the richness a little at the end.
Rolling Them So the Filling Stays Inside
Mixing the Filling
Combine the chicken, softened cream cheese, cheddar, sour cream, garlic powder, onion powder, and black pepper in a bowl until everything looks evenly coated. Stop mixing once it’s smooth and cohesive; overworking it can make the filling softer than you want. If the mixture seems too loose to mound, chill it for 10 minutes before shaping.
Shaping the Crescents
Separate the dough into triangles and keep the wider end facing you. Spoon about 2 tablespoons of filling near the wide end, then roll toward the point while tucking the sides in as you go. If you overfill them, the seam pops open in the oven, so resist the urge to pack in extra filling.
Baking to a Deep Golden Finish
Place the rolls seam-side down on the baking sheet and leave a little space between them so the sides can crisp. Brush the tops with melted butter before baking; that helps the dough color evenly and gives the surface a glossy finish. Bake until the tops are deep golden and the bottoms lift cleanly from the parchment, about 12 to 15 minutes. If the tops look done but the edges are still pale, give them another minute or two instead of pulling them early.
How to Adapt These Without Losing the Good Part
Use rotisserie chicken for the fastest version
Rotisserie chicken saves time and brings a little built-in seasoning, which works especially well here. Pull the meat into fine shreds and let it cool before mixing so it doesn’t thin the filling. The texture stays tender, and the rolls still bake up the same way.
Make it gluten-free with a crescent dough swap
Use a gluten-free refrigerated dough if you can find one, but expect it to be a little less stretchy and a bit more delicate when rolling. Chill the dough well and handle it gently so it doesn’t crack. The filling itself is already naturally gluten-free as long as your seasonings are.
Swap the cheddar for mozzarella or pepper jack
Mozzarella gives you a milder, stretchier center, while pepper jack adds a little heat. Either one works, but both taste best when mixed with at least a little cheddar so the filling doesn’t go flat. If you use a very soft cheese, keep the mixture thick so the rolls don’t leak.
Storage and Reheating
- Refrigerator: Store leftovers in an airtight container for up to 4 days. The crescent dough softens a little, but the filling stays creamy.
- Freezer: These freeze well after baking. Cool completely, wrap individually, and freeze for up to 2 months.
- Reheating: Reheat in a 350°F oven or air fryer until the center is hot and the outside crisps back up. The microwave works in a pinch, but it softens the dough and takes away that flaky finish.
The Things That Trip People Up With This Dish
Cheesy Chicken Crescent Rolls
Ingredients
Equipment
Method
- Preheat the oven to 375°F (190°C). The oven should be fully heated before baking so the rolls puff and brown evenly.
- Line a baking sheet with parchment paper. This prevents sticking and helps the bottoms stay crisp.
- In a bowl, combine cooked shredded chicken, cream cheese, shredded cheddar cheese, sour cream, garlic powder, onion powder, and black pepper. Stir until the mixture is evenly creamy with no dry pockets.
- Separate crescent roll dough into triangles. Work with one can at a time so the dough stays easy to handle.
- Place 2 tablespoons of filling on the wide end of each triangle. Keep the filling centered so it rolls up neatly.
- Roll up each triangle tightly, enclosing the filling. Pinch the seam gently so the filling doesn’t leak during baking.
- Arrange the rolled crescents on the prepared baking sheet. Leave a little space between them for airflow and even browning.
- Brush the tops with melted butter. The butter helps create a golden, lightly glossy finish.
- Bake at 375°F (190°C) for 12–15 minutes until golden brown. The rolls are ready when the dough looks set and the edges are browned.
- Sprinkle the rolls with chopped parsley and serve warm. The parsley adds a fresh herby finish right before eating.
