
Easy Keto Crunchwraps
Keto crunchwraps hit that sweet spot between fast-food nostalgia and a meal that actually keeps you full. You get the same layered bite — seasoned beef, melty cheese, cool lettuce,…
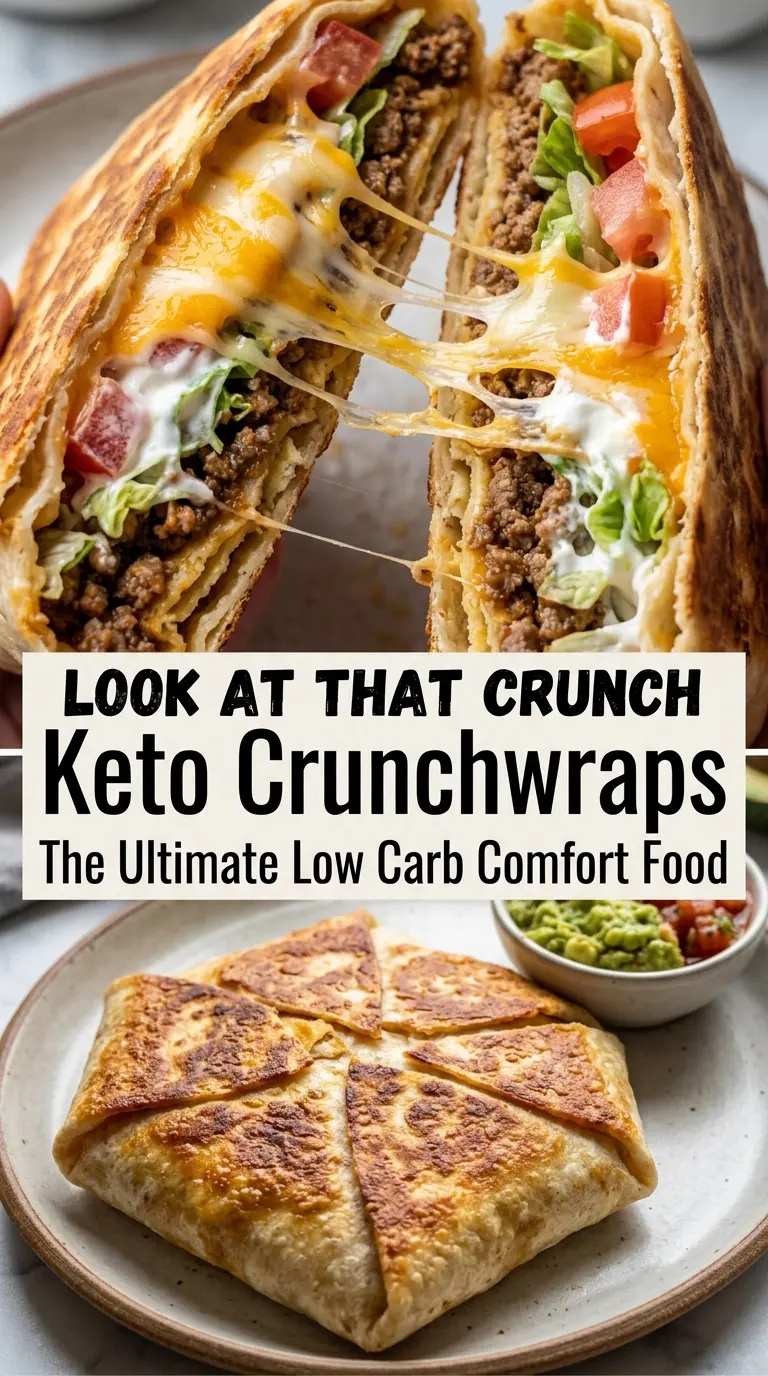
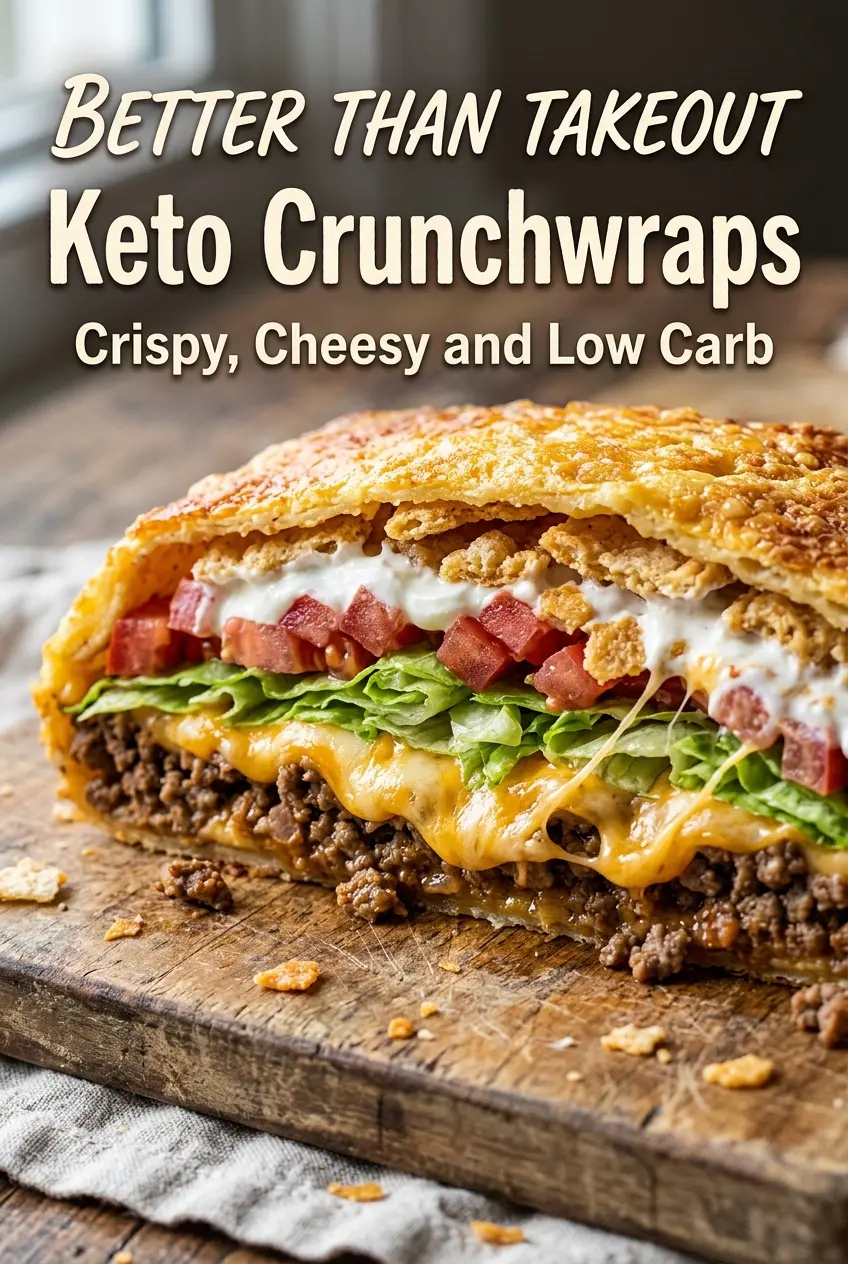
Tip: save now, cook later.Keto crunchwraps hit that sweet spot between fast-food nostalgia and a meal that actually keeps you full. You get the same layered bite — seasoned beef, melty cheese, cool lettuce, a little sour cream, and that crackly crisp exterior — without the tortilla overload that usually comes with it. The best part is the texture contrast. The outside browns into a shatteringly crisp shell while the center stays warm and soft, which is exactly what makes a crunchwrap worth making at home.
The trick is using a low-carb tortilla that can fold without tearing and a crunchy center layer that stands in for the tostada shell. If the tortilla is too stiff, it’ll split when you fold it; if it’s too soft, it won’t hold its shape in the skillet. A quick warm-up in the pan or microwave gives it just enough flexibility to seal into that familiar hexagon before it hits the oil.
Below, I’ve broken down the small details that keep the wrap tight, crisp, and easy to flip. There’s also a note on swaps if you want to change up the filling without losing the structure that makes this recipe work.
The tortilla folded without cracking after I warmed it for 20 seconds, and the seam actually stayed closed in the skillet. The center stayed crunchy, and my husband said it tasted like the drive-thru version but better.
These keto crunchwraps get that crisp fold and melty center just right, so you can skip the drive-thru and still get the crunch.
The Crisp Shell Problem: Why Low-Carb Crunchwraps Split
The part that usually goes wrong isn’t the filling. It’s the fold. Low-carb tortillas dry out faster than flour tortillas, and once they lose flexibility, they tear right where the folds overlap. Warm them first, and they behave more like a proper wrapper than a fragile cracker.
The other issue is overfilling. A crunchwrap needs enough filling to feel substantial, but not so much that the seams have to stretch around a domed center. Keep the beef in the middle, leave a border around the edge, and let the tostada or cheese crisp do the work of creating the crunch without crowding the fold.
What Each Ingredient Is Actually Doing in This Dish
- Ground beef — This gives the wrap its savory backbone and enough fat to keep the filling satisfying. An 85/15 blend works well because it has flavor without turning greasy; if you use leaner beef, the filling will taste a little drier unless you keep the seasoning and water step.
- Taco seasoning — This is where the beef gets its fast-food-style punch. Store-bought seasoning is fine here, but if yours is very salty, cut back a little and taste after simmering.
- Water — It doesn’t just dilute the seasoning. It helps the spices bloom and cling to the meat instead of sitting in dusty pockets at the bottom of the pan.
- Low-carb tortillas — These are the structure of the whole recipe, so quality matters. The best ones bend without cracking and crisp up without turning leathery; if yours are stiff, warm them first so they fold cleanly.
- Keto tostadas or baked cheese crisps — This is the crunch layer that keeps the name honest. A baked cheese crisp gives a richer, saltier bite, while a keto tostada keeps the texture closer to the fast-food original.
- Cheddar, lettuce, tomatoes, and sour cream — The cheese melts into the filling and helps hold everything together, while the cool toppings balance the hot beef. Chop the lettuce and tomatoes small so the wrap closes without bulky pockets pushing against the seam.
- Olive oil — You don’t need much, but a thin film helps the outside brown evenly in the skillet. A dry pan can work, yet the tortilla usually ends up patchy instead of evenly crisp.
How to Build the Fold So It Stays Closed in the Skillet
Cooking the Beef Until It’s Seasoned, Not Soupy
Brown the beef in a skillet over medium heat until the pink is gone and the crumbles have some color on the edges. Drain excess grease if the pan looks slick, then stir in the taco seasoning and water. Let it simmer until the liquid cooks off and the meat looks glossy, not wet. If the filling stays watery, it leaks into the tortilla and softens the whole wrap before it ever crisps.
Layering the Center for Structure
Lay the tortilla flat and keep the filling in a tight mound right in the center. Start with beef, then cheese, then the crunch layer, then sour cream, lettuce, and tomatoes. The order matters because the cheese helps glue the hot filling together, while the cool toppings sit on top where they won’t melt into a puddle. Leave a clean border around the edge so the tortilla has room to fold over itself without tearing.
Folding Into the Hexagon
Bring the edges up one by one, working around the tortilla so the folds overlap in the center. If the tortilla resists, warm it for a few seconds before trying again. You’re looking for a flat-topped hexagon with no exposed filling at the seams. Press the folds gently in the center so they stay put while you move the wrap to the skillet.
Getting the Outside Golden Without Burning It
Heat a thin layer of olive oil in the skillet and place the crunchwrap seam-side down first. That first side is what seals the folds shut, so let it cook undisturbed for 3 to 4 minutes until deep golden and crisp. Flip carefully and cook the second side just long enough to brown it. If the heat is too high, the tortilla burns before the center warms through; medium heat gives you the crisp shell and the melted middle at the same time.
Three Ways to Make These Keto Crunchwraps Fit Your Kitchen
Dairy-Free Crunchwrap Filling
Skip the cheddar and sour cream, then replace them with dairy-free shreds and a thick cashew-based crema or avocado mash. You’ll lose a little of the classic tang, but the wrap still holds together if the filling stays on the thicker side instead of runny.
Chicken Instead of Beef
Use shredded rotisserie chicken or cooked ground chicken with taco seasoning for a lighter filling. Chicken doesn’t bring as much fat or richness as beef, so the cheese and sour cream matter a little more for keeping the bite satisfying.
Extra-Crisp, Lower-Carb Version
Use a baked cheese crisp instead of a keto tostada and keep the tortilla thin. That gives you a sharper crunch in the center and cuts the carbs a bit more, but the wrap is a little more delicate, so handle it with a spatula when flipping.
Storage and Reheating
- Refrigerator: Store cooked crunchwraps for up to 3 days. The tortilla softens a little, but the flavor stays good.
- Freezer: Freeze after cooking and cooling completely. Wrap each one tightly, then reheat from frozen in a skillet or air fryer for the best texture; microwaving turns the tortilla rubbery.
- Reheating: Use a skillet over medium-low heat or an air fryer until the outside crisps again and the center is hot. High heat burns the tortilla before the filling warms through, which is the most common mistake.
Answers to the Questions Worth Asking
Easy Keto Crunchwraps
Ingredients
Equipment
Method
- Brown the ground beef in a skillet over medium heat.
- Drain excess grease from the skillet.
- Stir in taco seasoning and water until evenly combined.
- Simmer for 2 minutes, keeping the mixture at a steady bubble and thickening slightly.
- Lay the tortillas flat on a work surface.
- Add beef to the center of each tortilla.
- Top each portion with shredded cheese, keto tostada or baked cheese crisps, sour cream, shredded lettuce, and diced tomatoes.
- Fold the edges toward the center to create a hexagon shape, pressing gently to seal.
- Heat olive oil in a skillet over medium heat until shimmering.
- Place crunchwraps seam-side down in the skillet.
- Cook for 3–4 minutes per side until golden and crispy, flipping once the underside browns.
- Slice and serve warm.
