Crispy Canned Salmon Cakes
Golden, crisp-edged salmon cakes are one of those meals that feel far more substantial than the ingredients suggest. The outside turns deeply browned and crunchy in the pan while the…
Tip: save now, cook later.Golden, crisp-edged salmon cakes are one of those meals that feel far more substantial than the ingredients suggest. The outside turns deeply browned and crunchy in the pan while the center stays tender, lemony, and full of flaky salmon. They’re a smart way to turn pantry salmon into something you’d happily serve for lunch or dinner without fuss.
What makes these work is the balance. The salmon stays in small flakes so the cakes bind without turning paste-like, and the mix of mayo, egg, and just enough breadcrumbs keeps the texture moist but not heavy. Dijon and lemon brighten the fish, while parsley, green onion, and smoked paprika keep the flavor clean and layered instead of flat.
Below, I walk through the part that matters most: how to get the mixture to hold together, how long to chill it, and how to pan-fry the cakes so they brown before they dry out. There’s also a simple dill sauce if you want something cool and tangy alongside the crisp salmon.
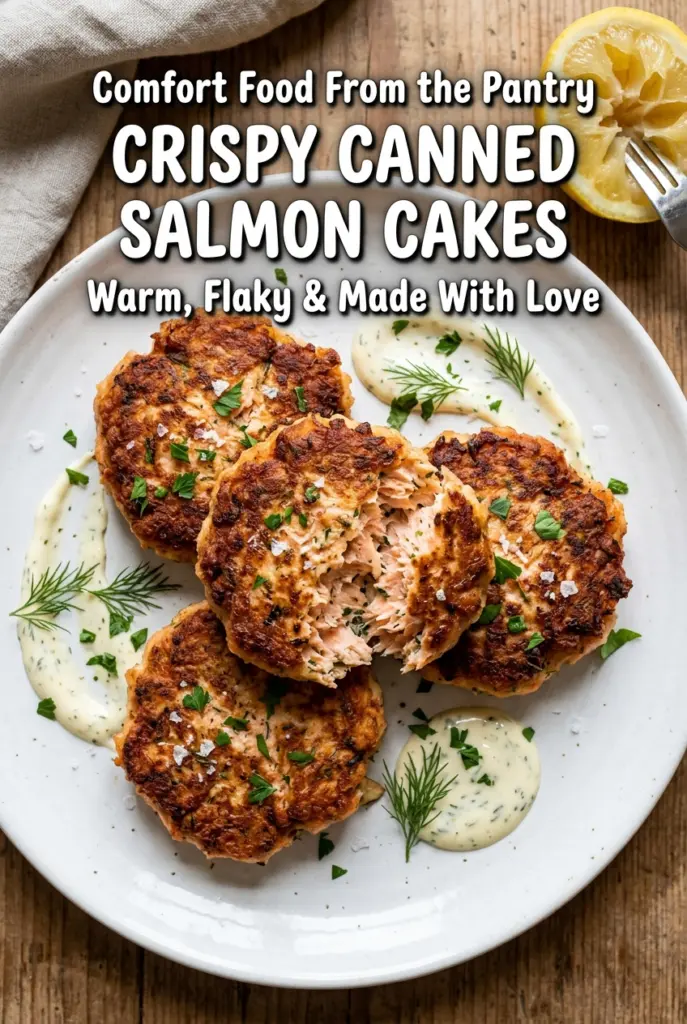
The salmon cakes held together beautifully after that short chill, and the outside got crisp without the centers drying out. The lemon and dill sauce was the perfect finish, and my picky eater asked for seconds.
Save these crispy canned salmon cakes for the nights when you want a fast pan-fried dinner with lemon, herbs, and a crunchy crust.
The Key to Crisp Salmon Cakes Is Managing Moisture, Not Adding More Breadcrumbs
Most salmon cakes fail in one of two ways: the mixture is too wet and falls apart, or it gets packed with so many breadcrumbs that the texture turns dry and bready. The fix starts before you even mix. Drain the salmon well, flake it into small pieces, and stop mixing as soon as everything comes together. You want enough binder to hold the cakes, not enough to bury the fish.
The short chill matters too. Ten to fifteen minutes in the fridge gives the cakes time to firm up so they land in the pan as patties instead of wobbling apart when you flip them. If the mixture still feels loose after mixing, add just a spoonful or two of breadcrumbs. Too much at once is how you lose that tender center.
- Canned pink salmon — This is the backbone of the recipe. Pink salmon is mild, affordable, and flaky enough to bind well. Drain it thoroughly and remove any large bones or skin if you want a smoother texture.
- Breadcrumbs — These help the cakes hold together and give them structure, but they shouldn’t dominate. Panko gives a lighter bite; plain breadcrumbs make a tighter cake. Add only enough to shape the mixture cleanly.
- Mayonnaise and eggs — These are the moisture and binder duo. Mayo keeps the cakes rich and prevents dryness, while egg sets the mixture in the pan. If you need to swap, Greek yogurt can replace some of the mayo, but the cakes will be a little tangier and less silky.
- Dijon, lemon, parsley, and green onion — These keep the salmon cakes bright. Dijon adds depth, lemon lifts the fish, and the herbs keep the flavor fresh. Don’t skip the lemon zest; it adds aroma without extra liquid.
How to Shape, Chill, and Pan-Fry Them Without Losing the Crust
Mixing Until Just Combined
Use a fork or your hands and stop the moment the mixture holds together. If you mash the salmon into a paste, the cakes turn dense and uniform instead of flaky. The mix should feel moist enough to pack, but not wet enough to slump in your palm. If it looks shaggy but forms a patty, you’re in the right zone.
Forming the Patties
Divide the mixture into equal portions so they cook at the same rate. Shape them about three-quarters of an inch thick and press the edges just enough to keep them from cracking. Thin cakes dry out before the crust develops, and very thick ones brown too fast before the center heats through.
Building the Crust in the Pan
Heat the oil until it shimmers, then lay the cakes in without crowding. If the pan is packed, they steam instead of crisp. Leave them alone for the first few minutes so the underside can form a deep golden crust; if you try to move them too early, they’ll tear. Flip with a thin spatula and let the second side catch up to the first.
Finishing and Serving
Pull the cakes when both sides are browned and the centers feel hot and set. A paper towel-lined plate helps catch excess oil, but don’t let them sit long or the crust softens. They’re best served right away with the cool dill sauce and a squeeze of lemon.
Three Ways to Make These Salmon Cakes Work for Your Table
Gluten-Free Salmon Cakes
Swap the breadcrumbs for gluten-free panko or crushed gluten-free crackers. The texture stays crisp, though crackers will give the cakes a slightly saltier, more seasoned finish.
Dairy-Free Dipping Sauce
Skip the sour cream or yogurt and serve the cakes with lemon mayo instead: mayo, lemon juice, dill, and a pinch of garlic powder. You lose the tangy dairy note, but the sauce stays creamy and still matches the salmon well.
Bake Instead of Pan-Fry
Brush the patties with oil and bake them on a well-oiled sheet pan at 425°F until the tops are golden and the centers are hot. The result is a little less crusty than skillet-fried cakes, but it’s a good option when you want less hands-on cooking.
Storage and Reheating
- Refrigerator: Store cooked salmon cakes in an airtight container for up to 3 days. They’ll soften a little, but they still reheat well.
- Freezer: They freeze well. Cool completely, wrap individually, and freeze for up to 2 months. Thaw in the fridge before reheating so the centers warm evenly.
- Reheating: Rewarm in a skillet over medium-low heat or in a 375°F oven until heated through. The common mistake is blasting them on high heat, which burns the crust before the middle is warm.
Answers to the Questions Worth Asking
Crispy Canned Salmon Cakes
Ingredients
Equipment
Method
- Drain the canned pink salmon thoroughly, removing any large bones and skin, then flake it into a large mixing bowl so the flakes are small for better binding.
- Add the beaten eggs, mayonnaise, Dijon mustard, breadcrumbs, parsley, green onions, garlic powder, smoked paprika, salt, black pepper, lemon juice, and lemon zest to the bowl.
- Mix gently with a fork until just combined, stopping as soon as you no longer see dry breadcrumb pockets so the cakes don’t turn dense.
- Check the texture and if the mixture feels too wet, stir in 1–2 more tablespoons breadcrumbs; if too dry, add a small spoonful of mayonnaise.
- Divide the mixture into 8 equal portions and shape each into a patty about 3/4 inch thick.
- Place patties on a plate and refrigerate for 10–15 minutes to help them hold their shape during pan-frying.
- Whisk sour cream or Greek yogurt with dill, lemon juice, and garlic powder, then season with salt and black pepper to taste.
- Refrigerate the dipping sauce while the patties cook so the flavors stay bright.
- Heat olive oil in a large non-stick skillet over medium heat until it shimmers.
- Add the salmon cakes in a single layer without crowding and cook 3–4 minutes on the first side, watching for a deep golden-brown crust.
- Flip carefully and cook 3–4 minutes more until the second side is deep golden-brown and cooked through.
- Transfer the salmon cakes to a plate lined with paper towels, adding more olive oil to the pan if needed for any remaining batches.
- Serve hot with the dipping sauce and lemon wedges for maximum crispness.
