
Cheesy Beef Quesadillas
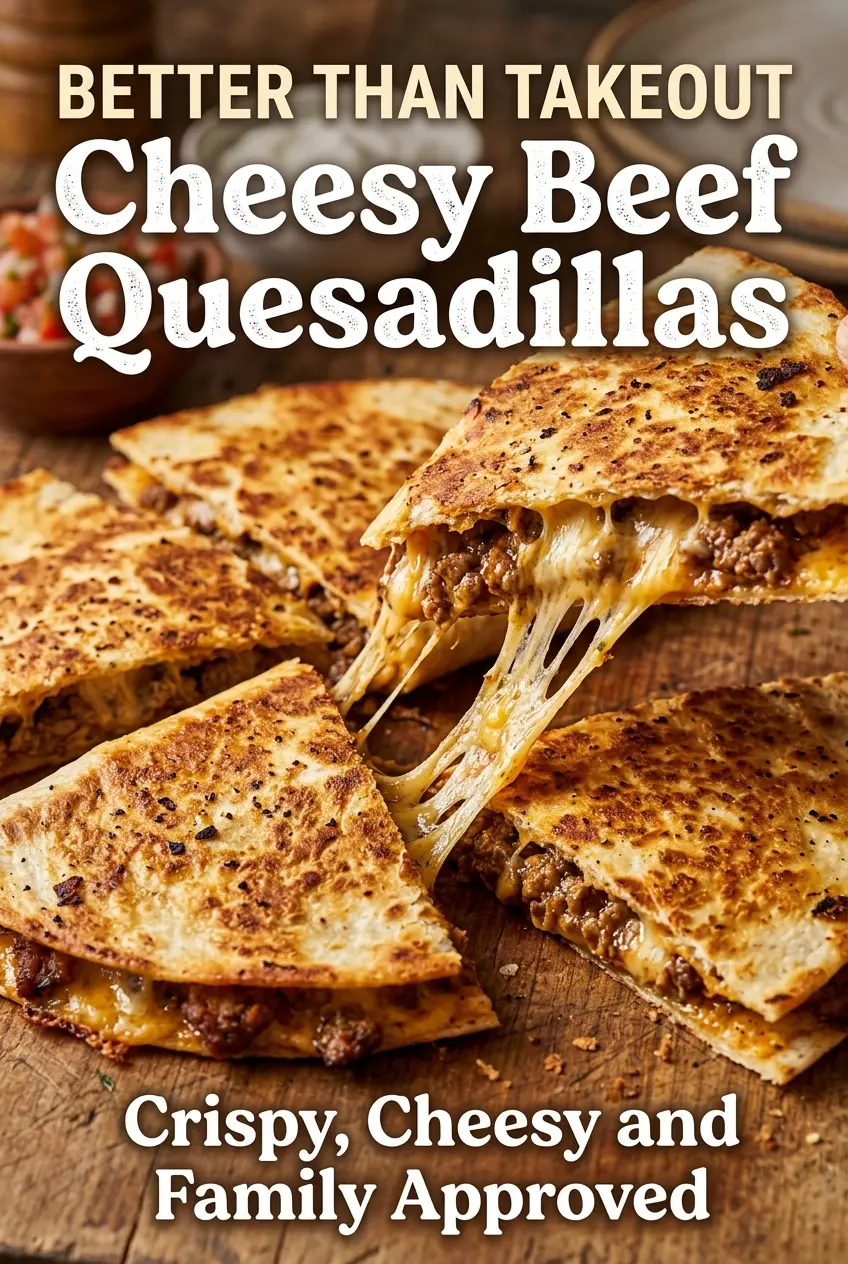
Crispy tortillas, stretchy melted cheese, and a savory beef filling make these quesadillas the kind of dinner that disappears fast. The outside gets deeply golden and shattery in the skillet…
Tip: save now, cook later.Crispy tortillas, stretchy melted cheese, and a savory beef filling make these quesadillas the kind of dinner that disappears fast. The outside gets deeply golden and shattery in the skillet while the center stays soft, gooey, and packed with seasoned beef. That contrast is what keeps this version from feeling flat or greasy.
The filling starts with onion and garlic cooked into the beef, which gives the meat a real base instead of just a taco-seasoning coating. A spoonful of salsa does more than add flavor; it brings enough moisture to keep the filling from tasting dry, but not so much that the tortillas go soggy. I also like using the cheese in two layers — under the beef and over it — because that helps glue everything together once the tortilla folds over.
Below, I’ll walk through the part that matters most: keeping the quesadillas crisp instead of steamed. You’ll also find a few smart swaps and the best way to reheat leftovers without losing that crunchy edge.
The beef stayed juicy, the cheese melted right through, and the tortillas crisped up perfectly without getting greasy. My teenager asked if I could put these on the weekly dinner rotation.
These cheesy beef quesadillas crisp up beautifully with that seasoned beef and double layer of melted cheese.

The reason these quesadillas stay crisp instead of turning soggy
The biggest mistake with beef quesadillas is overfilling them with wet filling and expecting the tortilla to hold up. Salsa adds flavor here, but it also adds moisture, so the filling needs a short simmer to cook off some of that liquid before it goes anywhere near the tortilla. If the beef mixture looks soupy in the pan, it will steam the tortilla from the inside.
Another common problem is cooking too hot. A quesadilla should sizzle gently in butter, not race toward dark brown spots. Medium heat gives the cheese time to melt before the tortilla burns, and that slow melt is what helps everything bind together when you cut it.
- Lean ground beef — Leaner beef keeps the filling from turning oily. If yours has more fat, drain it well after browning so the tortillas don’t absorb grease.
- Taco seasoning — This gives the beef its familiar backbone. Store-bought seasoning works fine, but if yours is salt-heavy, taste before adding the full amount of extra salt.
- Salsa — This is the moisture and acidity that keep the filling from tasting flat. Thick salsa works better than a watery one; thin salsa makes the filling too loose.
- Mexican cheese blend — Shredded cheese melts more evenly than slices and gives you those stretchy pulls when you cut the quesadilla. Freshly shredded cheese melts better than the prebagged kind, which often has anti-caking starch.
- Flour tortillas — Large flour tortillas fold without cracking and brown evenly in the skillet. Corn tortillas won’t give you the same pliable, sealed finish for this style.
- Butter — Butter helps the tortilla turn crisp and rich on the outside. Use enough to coat the pan lightly; too much and the quesadillas fry instead of toast.
Building the filling so the cheese melts before the tortilla burns
Cooking the beef base
Start by softening the onion in olive oil until it turns translucent and loses its raw bite. Add the garlic for just 30 seconds so it smells fragrant without turning bitter, then brown the beef until no pink remains. If there’s a lot of grease in the pan, drain it off before the seasoning goes in or the filling will taste heavy.
Reducing the moisture
Stir in the taco seasoning, paprika, salt, pepper, and salsa, then let the mixture simmer for about 2 minutes. You want the liquid to cling to the meat, not pool at the bottom of the pan. If the filling still looks wet, give it another minute uncovered; that extra step is what keeps the tortillas crisp later.
Layering for a clean melt
Lay each tortilla flat and build the quesadilla with cheese on the bottom, beef in the middle, and more cheese on top before folding. The bottom layer of cheese acts like glue and helps seal the filling in place. Press the folded tortilla gently so it lies flat in the pan, but don’t smash it hard or the filling will squeeze out at the edges.
Cooking to a crisp finish
Melt butter in a skillet over medium heat and cook the folded quesadillas for 2 to 3 minutes per side. You’re looking for a deep golden color and crisp spots that feel dry to the touch when you lift a corner. If the tortilla browns before the cheese melts, the pan is too hot; lower the heat and give the center time to catch up.
How to adapt these cheesy beef quesadillas without losing the crisp edges
Make them with ground turkey
Ground turkey works well if you want a lighter filling, but it needs a little more help with flavor. Add the seasoning exactly as written and don’t skip the salsa, since turkey can taste dry and flat without that extra moisture. The texture will be a little leaner and less rich than beef, but still satisfying.
Gluten-free version
Use certified gluten-free tortillas and check that your taco seasoning is gluten-free too. Gluten-free tortillas can be more fragile, so warm them briefly before folding and keep the heat on the lower side while they cook. They won’t crisp quite the same way, but they still hold the filling well.
Make them spicier
Add diced jalapeños to the beef or stir a little hot sauce into the salsa before simmering. That gives you heat throughout the filling instead of just on the surface. If you want more bite without changing the texture, use pepper jack in place of some of the cheese blend.
Storage and Reheating
- Refrigerator: Store cooked quesadillas in an airtight container for up to 3 days. The tortilla softens a little as it sits, but the filling stays good.
- Freezer: Freeze cooled quesadillas in a single layer, then wrap them tightly. They freeze well for about 2 months, though the tortilla won’t be quite as crisp after thawing.
- Reheating: Reheat in a dry skillet over medium-low heat until the outside crisps again and the cheese melts. The microwave makes the tortilla chewy, which is the fastest way to lose the texture that makes these worth making.
Questions I get asked about these beef quesadillas
Cheesy Beef Quesadillas
Ingredients
Equipment
Method
- Heat 1 tablespoon olive oil in a large skillet over medium heat until shimmering.
- Add the onion and cook for 3 minutes until softened.
- Stir in the garlic and cook for 30 seconds.
- Add the lean ground beef and cook until browned, stirring occasionally to break it up.
- Drain excess grease if needed.
- Stir in taco seasoning, paprika, salt, black pepper, and salsa; simmer for 2 minutes, then remove from heat.
- Lay the flour tortillas flat on a work surface.
- Sprinkle Mexican cheese blend over half of each tortilla.
- Add a layer of beef mixture over the cheese.
- Top with additional Mexican cheese blend.
- Fold tortillas in half.
- Melt 2 tablespoons butter in a skillet over medium heat.
- Cook quesadillas for 2–3 minutes per side until golden brown and crispy.
- Slice and serve with salsa, sour cream, or guacamole.
