Red White & Blue Marble Cake
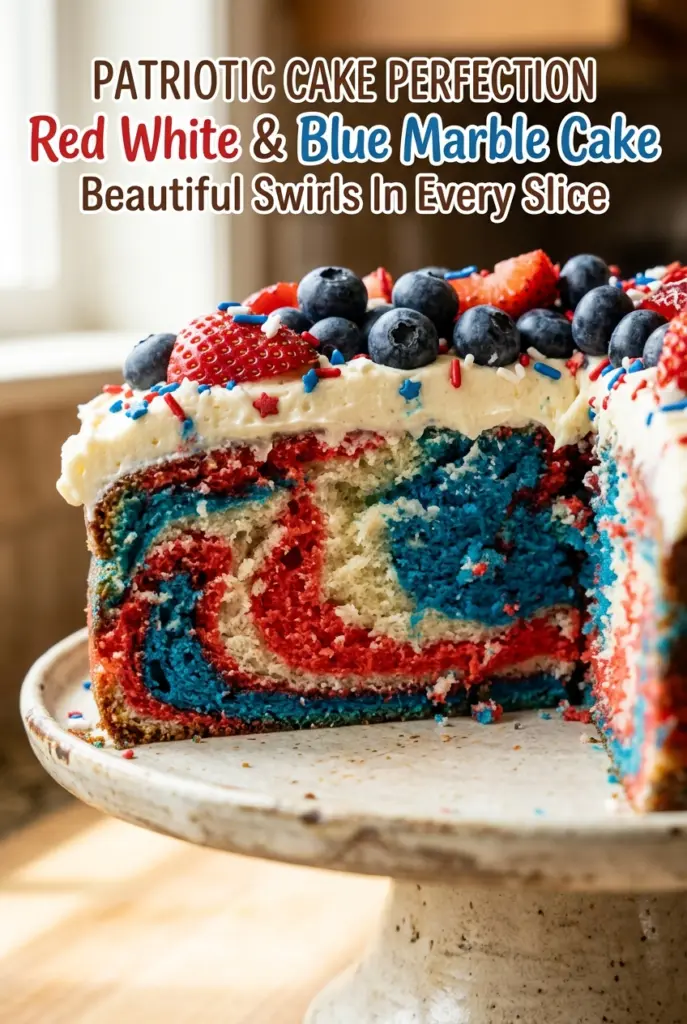
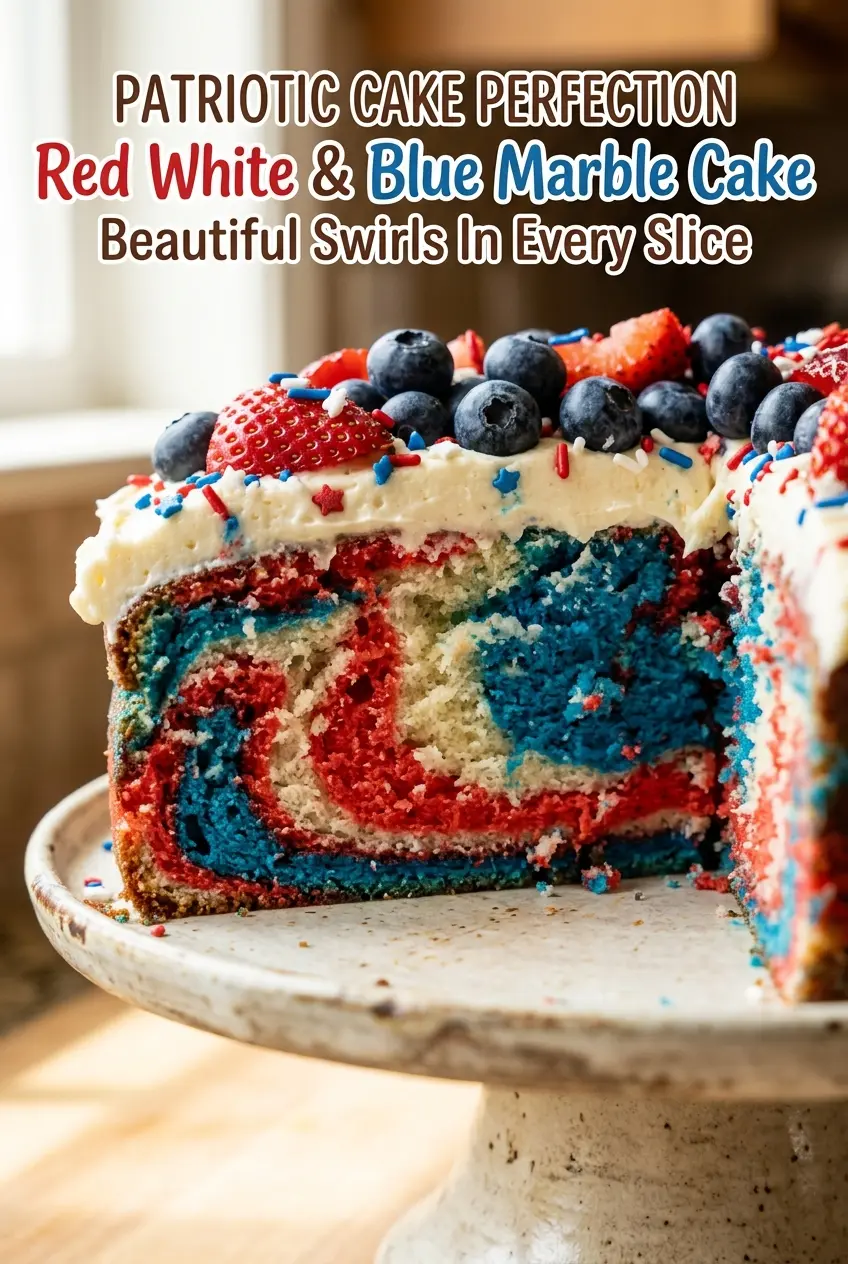
Red, white, and blue marble cake gets all the celebration energy from the inside out. The slices are the part that gets people talking: soft vanilla crumb with bold swirls…
Tip: save now, cook later.Red, white, and blue marble cake gets all the celebration energy from the inside out. The slices are the part that gets people talking: soft vanilla crumb with bold swirls that stay distinct instead of turning muddy, and a fluffy frosting that gives the whole cake that bakery-style finish without hiding the pattern you worked for.
What makes this version work is the batter texture. It’s rich enough to hold color but still loose enough to swirl cleanly, and the colors stay sharp because the batter is divided after mixing, not after baking. The key is using gel food coloring, which gives strong color without thinning the batter or changing how the cake bakes.
Below, I’ve included the small details that matter most: how to keep the marbling bright, what to watch for when you swirl, and a few ways to adapt the cake for different occasions without losing that striking red, white, and blue look.
The layers baked up so even and the swirls stayed bright after frosting. I loved that the cake stayed moist for two days, and the vanilla flavor worked perfectly with the berries on top.
Save this red, white, and blue marble cake for a patriotic dessert with bright swirls and a soft vanilla crumb.
The Trick to Keeping the Swirls Bold Instead of Blending Them Out
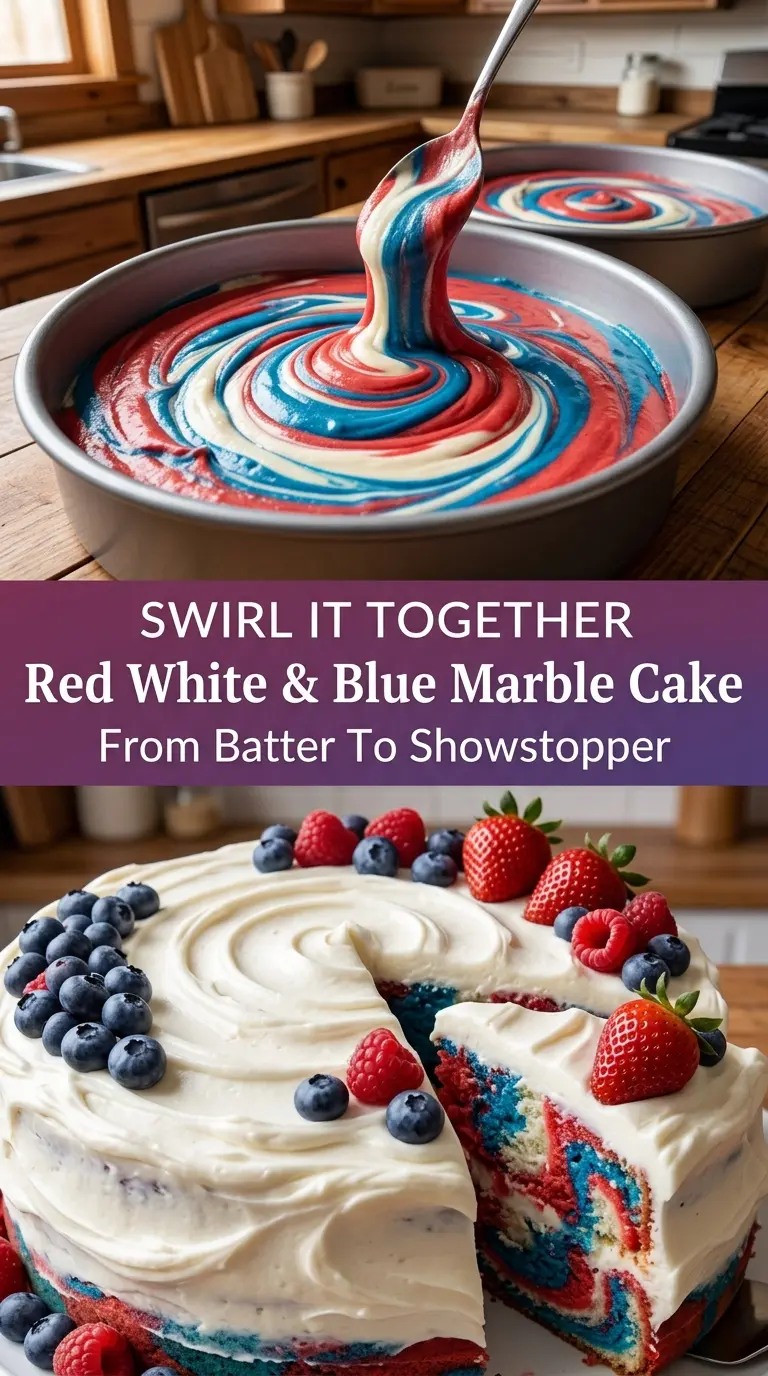
The biggest mistake with marble cake is overworking the batter once the colors go in. Stir too much and the red and blue start to gray out, which is how you end up with a cake that tastes fine but looks dull in the middle. You want separate dollops of batter, not a fully mixed rainbow.
Another thing that matters here is the order of the marbling. Spoon the batters into the pans in alternating patches, then drag a knife through just a few times. If you keep swirling, the colors disappear into one another. A couple of loose figure-eight passes is enough to get those clean ribbons.
- Gel food coloring gives you strong color without thinning the batter. Liquid coloring can work in a pinch, but you’ll need more of it, and the batter may become looser.
- Whole milk keeps the crumb tender and gives the batter enough body to hold the swirls. Lower-fat milk works, but the texture won’t be quite as soft.
- Unsalted butter lets you control the salt level in both the cake and frosting. If you use salted butter, reduce the added salt slightly.
- Fresh berries and sprinkles are for the finish, but they matter. Add them right before serving if you want the color contrast to stay crisp and the berries to look fresh.
What Each Ingredient Is Doing in the Marble Cake Batter
All-purpose flour gives the cake enough structure to support the marbling and frosting without turning heavy. Cake flour can make it a little finer and softer, but all-purpose flour holds up well here and is easier to keep consistent.
Butter and sugar build the base of the crumb. Cream them until the mixture looks pale and fluffy, because that trapped air helps the cake rise evenly. If the butter is too cold, the batter will look curdled and won’t whip properly; if it’s melted, the cake loses lift.
Eggs add richness and help the batter emulsify. Add them one at a time so the mixture stays smooth. Vanilla extract matters more than it might seem in a cake this simple, because it keeps the flavor from tasting flat once the frosting and berries go on.
Powdered sugar, heavy cream, and butter make a frosting that spreads cleanly and sets up with enough body to hold the decoration. If you don’t have heavy cream, whole milk works, but start with less than the recipe calls for so the frosting doesn’t go slack.
Building the Layers So the Colors Stay Distinct
Mix the Batter Until It Just Comes Together
Start by whisking the dry ingredients so the baking powder is evenly distributed. When you add the flour mixture and milk to the butter base, alternate them in batches and stop as soon as the batter looks smooth. Overmixing at this point develops too much gluten and makes the cake tougher, which also makes the swirls harder to cut cleanly.
Divide First, Color Second
Split the batter evenly into three bowls before adding color. Leave one bowl plain, then tint the other two with gel coloring a little at a time until the shades look bold and even. If you dump in a lot all at once, you can overshoot the color fast, and the batter can turn darker than you want after baking.
Swirl Lightly, Then Stop
Spoon alternating dollops of batter into each prepared pan so the colors sit next to each other instead of blending immediately. Use a knife to make just a few gentle swirls through the top layer. The batter should still look separate in places when it goes into the oven; that’s what creates the marble effect instead of a single mixed color.
Cool Completely Before Frosting
The cake layers need to cool all the way down before you frost them. If they’re even a little warm, the frosting softens and starts sliding, and the top decoration gets messy. A fully cooled cake slices cleaner too, which matters when the whole point is showing off the pattern inside.
How to Adapt This for Different Celebrations
Make it dairy-free
Use a good plant-based butter in both the cake and frosting, and replace the milk with unsweetened almond milk or oat milk. The cake will still bake up tender, though the frosting may taste a little less rich and need an extra pinch of salt to sharpen it.
Go gluten-free
A 1:1 gluten-free baking flour blend works best here. The cake will be a touch more delicate, so let the layers cool completely before moving them, and don’t swirl too aggressively or the batter can lose its lift.
Turn it into cupcakes
Divide the colored batters into lined muffin cups with a small spoonful of each color in every cup. Bake for a shorter time, about 18 to 22 minutes, and watch for lightly springy tops. Cupcakes give you the same marbled look, just in a faster, party-friendly form.
Storage and Reheating
- Refrigerator: Store covered for up to 4 days. The crumb stays soft, but the frosting will firm up a bit in the fridge.
- Freezer: Freeze unfrosted layers wrapped tightly for up to 2 months. Thaw overnight in the fridge before frosting; frosted slices can be frozen, but the decoration won’t look as neat after thawing.
- Reheating: Bring slices to room temperature instead of microwaving them. Heat can melt the frosting and make the crumb taste dry, while a short rest on the counter keeps the texture soft.
Answers to the Questions Worth Asking
Red White & Blue Marble Cake
Ingredients
Equipment
Method
- Preheat the oven to 350°F (175°C). Grease and line two 8-inch cake pans so the layers release cleanly.
- Whisk the all-purpose flour, baking powder, and salt in a bowl until evenly combined. The mixture should look uniform with no visible dry clumps.
- Beat the softened unsalted butter and granulated sugar until light and fluffy. Scrape the sides as needed so the batter turns paler in color.
- Add the large eggs one at a time, mixing well after each addition. Then mix in the vanilla extract until smooth.
- Alternate adding the dry ingredients and whole milk until the batter is smooth. Stop mixing once no streaks of flour remain for the best tender crumb.
- Divide the batter equally into three bowls, keeping one uncolored as the white portion. Tint one bowl red with red gel food coloring and one bowl blue with blue gel food coloring.
- Spoon alternating dollops of red, white, and blue batter into each pan. Aim for even coverage so each slice shows swirls.
- Swirl gently with a knife to create a marble effect. Use light, shallow motions for distinct streaks rather than fully mixing the colors.
- Bake at 350°F (175°C) for 28–32 minutes until a toothpick comes out clean. The tops should spring back lightly when touched.
- Cool the cakes completely before frosting. The layers should be room temperature so the frosting stays thick and does not melt.
- Beat the softened unsalted butter until smooth, then gradually add powdered sugar. Mix in the heavy cream, vanilla extract, and a pinch of salt until fluffy and spreadable.
- Frost the cake layers and cover the exterior with an even layer of frosting. For cleaner edges, spread while the frosting is still airy.
- Decorate with red, white, and blue sprinkles, fresh strawberries, and fresh blueberries. Place berries and fruit so they’re visible in the finished slices.
- Slice and serve the red white & blue marble cake. Let the first cut sit for a minute so the marbling holds its shape.
